Customer Insights Portal Overview
Users will access the Customer Insights Portal at Analytics.Wellframe.com. The Customer Insights Portal is hosted through Looker, a Google analytics service. While this User Guide serves as a resource, Looker may update its features and functionality at any time.
This guide is intended for a seasoned Wellframe business user. The business user has access to Staff Personally Identifiable Information (PII). There are additional resources available with the definitions for metrics in the reports in the Customer Insights Portal. This guide covers functionality.
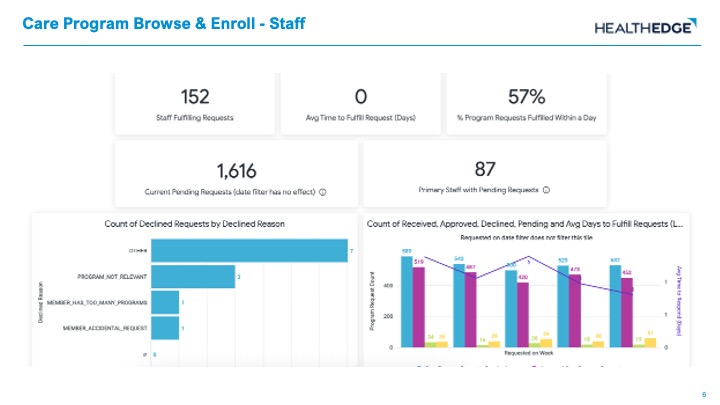
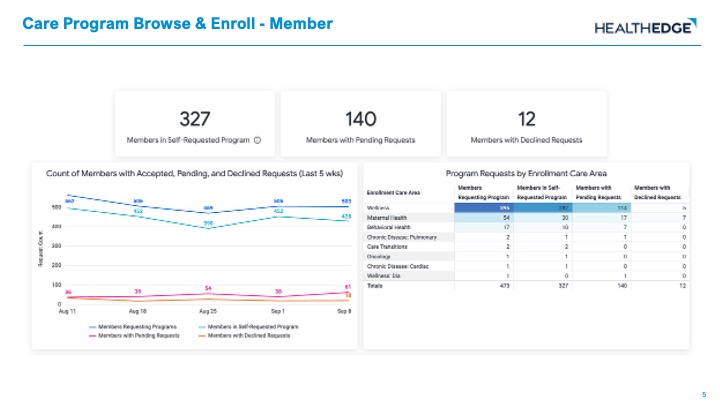
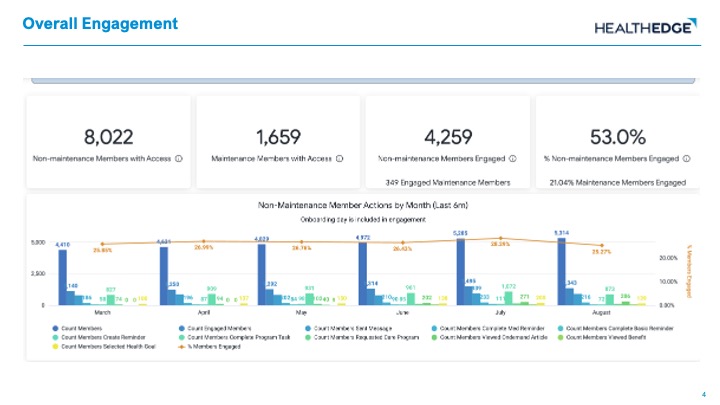
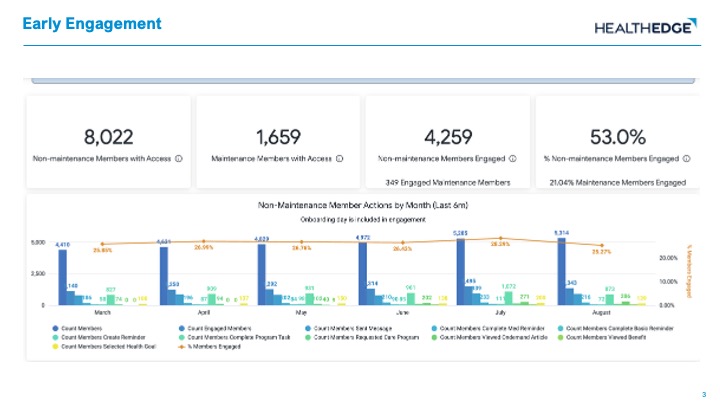
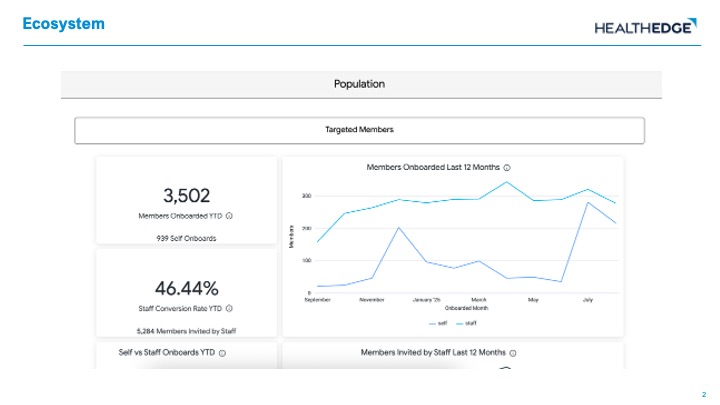
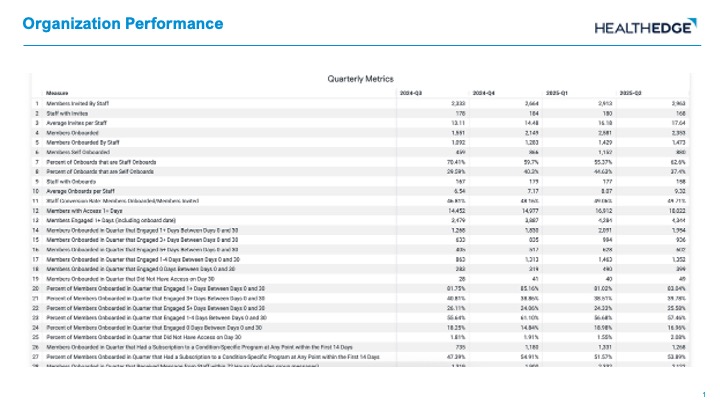
Report Preview
Navigation
Logging In with Google Authenticator
Your account is created for you by HealthEdge, and you will receive an email from svc-wf-reports@healthedge.com with login information. Use your company email address to log in at analytics.wellframe.com and input your information:
- First Name
- Last Name
- Password
During the first login, a QR code will appear for you to scan on your phone with Google Authenticator or another authenticator app. The authenticator will guide you through the set up, and you will receive a six-digit code to enter in your account on the computer.
After the first time you log in, you will not need to scan the QR code each time.
- Check the “Stay Logged In” box if it is a trusted computer.
- Every 30 days, you will need to provide a six digit code from the Google Authenticator app. This is a security measure to re-confirm your secure access to Looker.
- If you do not check “Stay Logged In,” you will need to provide a six digit code from the Google Authenticator app each time you log in. You will also be automatically signed out every 30 minutes as a security precaution.
Log In Troubleshooting
If you have multiple accounts, you may not be prompted to log in to the Wellframe Customer Insights Portal when you visit Looker. To address this, click on the Alternate login page (email/password) button and enter Wellframe specific credentials.
Viewing Reports
To view the up to date data in the Customer Insights Portal, take the following steps:
- Login at analytics.wellframe.com
- Select the dashboard you want to view, and click on it to open.
- Select your Plan or Hospital name in the first field using the dropdown.
- Add any additional filters you want to apply to the dashboard by selecting from the dropdown list.
Click the blue Update button in the top right of your screen. The tiles will reload with data. The button will be replaced with a new icon that will show when the data was refreshed.
Autosize All Columns
Looker, the service used for the Customer Insights Portal, automatically scales the reports to your screen size. Sometimes the full text of a title may not display. For best results, click on the three dots at the top of each table to select Autosize All Columns. You can also utilize the native zoom function in your browser to zoom out, allowing more to display.
Saving URL Links
Looker works in your web browser, so each dashboard has a unique URL. When you apply filters to the dashboard, the URL changes to reflect the unique combination of filters used to create the view. This URL link can be used to:
- Save the URL and reference it later.
- Send the URL to another Customer Insights Portal user so they can see the data you were also referencing.
- Send the URL to your Healthedge contact so they can see what filters you applied.
Tip: When saving a URL to reference later, consider using relative date ranges such as “Last Month” so that the dates will automatically update over time.
Date Range Selection
Each dashboard will prepopulate a time period in the date range filter field. You can adjust this to your needs using:
- Actual date ranges (ex: 1/1/2023 – 2/16/2023). This will populate data from 1/1/23 – 2/15/23 because the filter is looking at data before the end date.
- Relative periods (ex: in the last 1 week, in the year)
Some tiles will not update with the selected date range. These tiles have a date range pre-specified and labeled on the tile. These tiles have the pre-specified time periods as Wellframe determined the metrics would be meaningful with these time periods applied. Examples are:
- Last 30 Days
- Last 12 weeks
- Year To Date
- Cumulative
When selecting date ranges, there are options for relative periods and complete relative periods.
- A complete relative period means that the period is complete.
- The past 1 day is today, and the past 1 complete day is always yesterday.
- The past 1 month is the last month period, and the past 1 complete month is the prior, already completed month.
- The function of a time period vs a complete time period follow the same rules, regardless of which time period is selected.
Complete Week Example
Let’s imagine today is Wednesday. The last 1 week would include data from the previous Thursday to today, Wednesday, represented in Green. The last 1 complete week would include the previous Monday – Sunday, represented in Blue.

Current Day vs Complete Day
Data will not be available for the current day when you are using the Customer Insights Portal. Data is updated overnight to represent each complete day of data. Always use the previous, complete day to get the most recent day of data.
Sorting Data
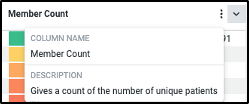
To sort within a table, click on the column name of the field you want to use to order the data. The data will reload. A description is also available when you hover over the title.
Focusing a Visual
To remove a field from a visual, click on it in the legend so that the color is grayed out. It will now be hidden from the visual. Click on the legend for the data to display again.

→

Exporting Data
An entire dashboard can be exported into a CSV or PDF, and individual tiles (visualizations) can be exported with additional format options (TXT, Excel Spreadsheet, JSON, HTML, Markdown, PNG, PDF). To export, click on the three dots on the top right corner of the screen for the entire dashboard or on each individual tile.
Click on Download data. A popup with format options will appear. Select the format you prefer, and click Download. It will download in your browser.
Scheduling Reports
Users will have the option to schedule emailed reports to themselves or others within their whitelisted domain, ie. If @healthedge.com is whitelisted, users can send an email to anyone with that email address. Reach out to your HealthEdge Customer Success Manager to add email addressses to the whitelisted domain. If you don’t see the emailing option, contact your HealthEdge Customer Success Manager to request access.
Customize Delivery Options
- Go to any report in the Customer Insights Portal, and apply the dashboard filters you want on your scheduled report.
- Click on the three dots on the top right corner of the screen for the entire report and click “Schedule Delivery”
- Settings Tab
- Schedule Name: Report name should be something you can easily remember and distinguish from other reports, ie “Onboarding Details for XYZ– Weekly”
- Recurrence: How often should this report be delivered? Daily, weekly, monthly, or specific days of the week? State the date and time. Note: Data is refreshed every morning, reports should be sent after 10AM EST for the latest data. If you need to schedule multiple reports, we recommend spacing them out in 10 minute increments.
- Destination: This will always be email
- Email addresses: List the recipients of the report. Press “enter” after each email address. Note: Emails are case sensitive, make sure you type the right address.
- Format: State the file type of the delivered report: PDF, CSV, or PNG
- Filters Tab
- The filters applied to the scheduled report should be the same as the dashboard
- Advanced Options Tab
- Custom Message: Optional, include a message to be sent along with your report
- Expand tables to show all rows: Optional, if the dashboard has tables with many rows, you can click on this checkbox to show all rows in your scheduled report
- Leave all other options on this tab as is
- Settings Tab
- After confirming the selections on your scheduled report, click “Save”. The report will automatically send at the next scheduled recurrence.
Manage Scheduled Reports
- Click on your profile icon on the top right corner of the screen. Click “Schedules”. This will bring you to a page that lists all your scheduled reports.
- If you want to delete a schedule, click on the “Delete” button next to the listed schedule.
- If you want to edit an existing report, click on the “Name” of the report. This will bring you to the actual report.
- Click on “Schedule Delivery” from the three dots on the top right corner of the report.
- There can be multiple schedules for one report. Find the report you want to edit and click the three dots to “Edit” the report
- Edit the report as you normally would, under the “Customize Delivery Options” section of this documentation, and click “Save”
Troubleshooting
Technical Issues
For technical issues, such as difficulty logging in, error messages, buttons not working, missing data, please reach out to support@wellframe.com, and the Wellframe Customer Support team will work to resolve the issue as soon as possible.
Account Creation
To create an account, the user’s first and last name and email address should be sent to your HealthEdge Customer Success Manager from a contact authorized to approve/deny access.
Resetting a Password
To reset a password, click on Forgot your password? on the login page and enter the email address for your Looker account to receive a link to reset your password.
Receiving Emails from Looker
Emails will be sent to you from svc-wf-report@healthedge.com If the emails do not appear to be sending to your inbox, work with your IT department to have the healthedge.com domain whitelisted so that you can avoid this frustration in the future.
Account Removal
To delete an account, the user’s first and last name and email address should be sent to your HealthEdge Customer Success Manager from a contact authorized to remove user access.
Reporting Questions and Feedback
For questions about specific measures, visuals, or feedback about desired reporting, enhancement requests, or new features, please contact your designated HealthEdge Customer Success Manager.
Last Updated: